Basic Facts on How Arrow Cements Work
- Arrow plastic pipe solvent cements work by solvent action.
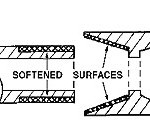
- When cement is applied, solvent action softens (dissolves) the pipe and fitting surfaces, preparing them for joining. (See Fig. 2)
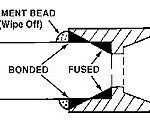
- A few seconds after joining, the interference section fuses together. The non-interference section is bonded together. (See Fig. 3)
- The joint cures by evaporation of the cement solvents. If possible, allow 24 hours before pressure testing – longer in cold weather.
- Figure 1
- Figure 2
- Figure 3
Important Points for Trouble-Free Use
Interference Fit
- Required for proper solvent action.
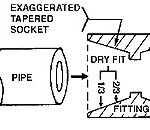
- 1/3 to 2/3 dry fit is best. (See Figure 1) ‘Dry fit’ is without cement.
- If pipe fully inserts in fitting, it should be snug. Avoid loose fits.
Pipe Cut
- Cut pipe square and remove burrs to avoid leaks.
Proper Cleaning
- Remove all dirt, oil, moisture and surface gloss for best results.
- Arrow 901 Cleaner can be applied to non-pressure systems and ABS pipe/fittings.
Apply Primer
- Vigorously apply Primer to PVC and CPVC pipe/fittings.
Proper Cement
- Check that cement is recommended for pipe type, diameter, application and for use in your specific working conditions.
- Make sure cement is free-flowing and not gelled.
Apply Cement
- Apply a heavy coat of cement to pipe, a light coat to fitting socket and another coat to pipe.
Join Pipe & Fitting
- Use a slight twisting motion to insert pipe into fitting until it bottoms and hold for a few seconds to prevent pipe from pushing out.
- A joint should fuse (‘Grab’) shortly after joining pipe and fitting. If not, avoid using as it may pull out or leak.
Cement Bead
- A cement bead will appear at pipe/fitting interface if enough cement was used.
- Wipe off bead to speed joint curing.
Curing
- Allow sufficient curing time (24 hours is best) to assure a strong joint.


